All about Show cooking

Archive for the ‘Recipes’ Category

Best-Ever Chocolate Sauce Pudding

image
I don’t make this claim lightly, but this is the best version of a chocolate self-saucing pudding that I’ve ever tasted!  The recipe comes from my mother, many years ago, and I don’t know its origin, but it’s very similar to one featured in the cookbook bistro, by the wonderful Philip Johnson, owner and chef of the highly decorated e’cco bistro in Brisbane. I was fortunate to attend the launch of that book in 2004, where Philip spoke about the origins of his recipe in New Zealand, with his own mother and a school or community cookbook. The main difference between his and mine is that mine doesn’t have an egg in the cake mix (and he has swapped in some chopped chocolate with less sugar), but other than that, the similarity is such that they must have had the same origin, 50+ years ago, and I spoke with him about it when he signed my copy of the book, which I still treasure. It demonstrates that sometimes the origin of recipes can’t be traced, but small tweaks (like my version having no egg), creep in. I’ve seen many versions of this classic home-cooked pudding, but none as good as this one, at least in my view! Here is my version:

Cake
1 cup self-raising flour
Pinch salt
1/2 cup caster sugar (my mother’s recipe had 3/4 cup (imperial), but it seems too sweet, adjust to your preference
2 level tablespoons cocoa
1/2 cup milk
1/2 teaspoon vanilla essence
1 tablespoon melted butter

Topping/sauce
3/4 cup brown sugar
1/4 cup cocoa
1 3/4 cup hot water

Method
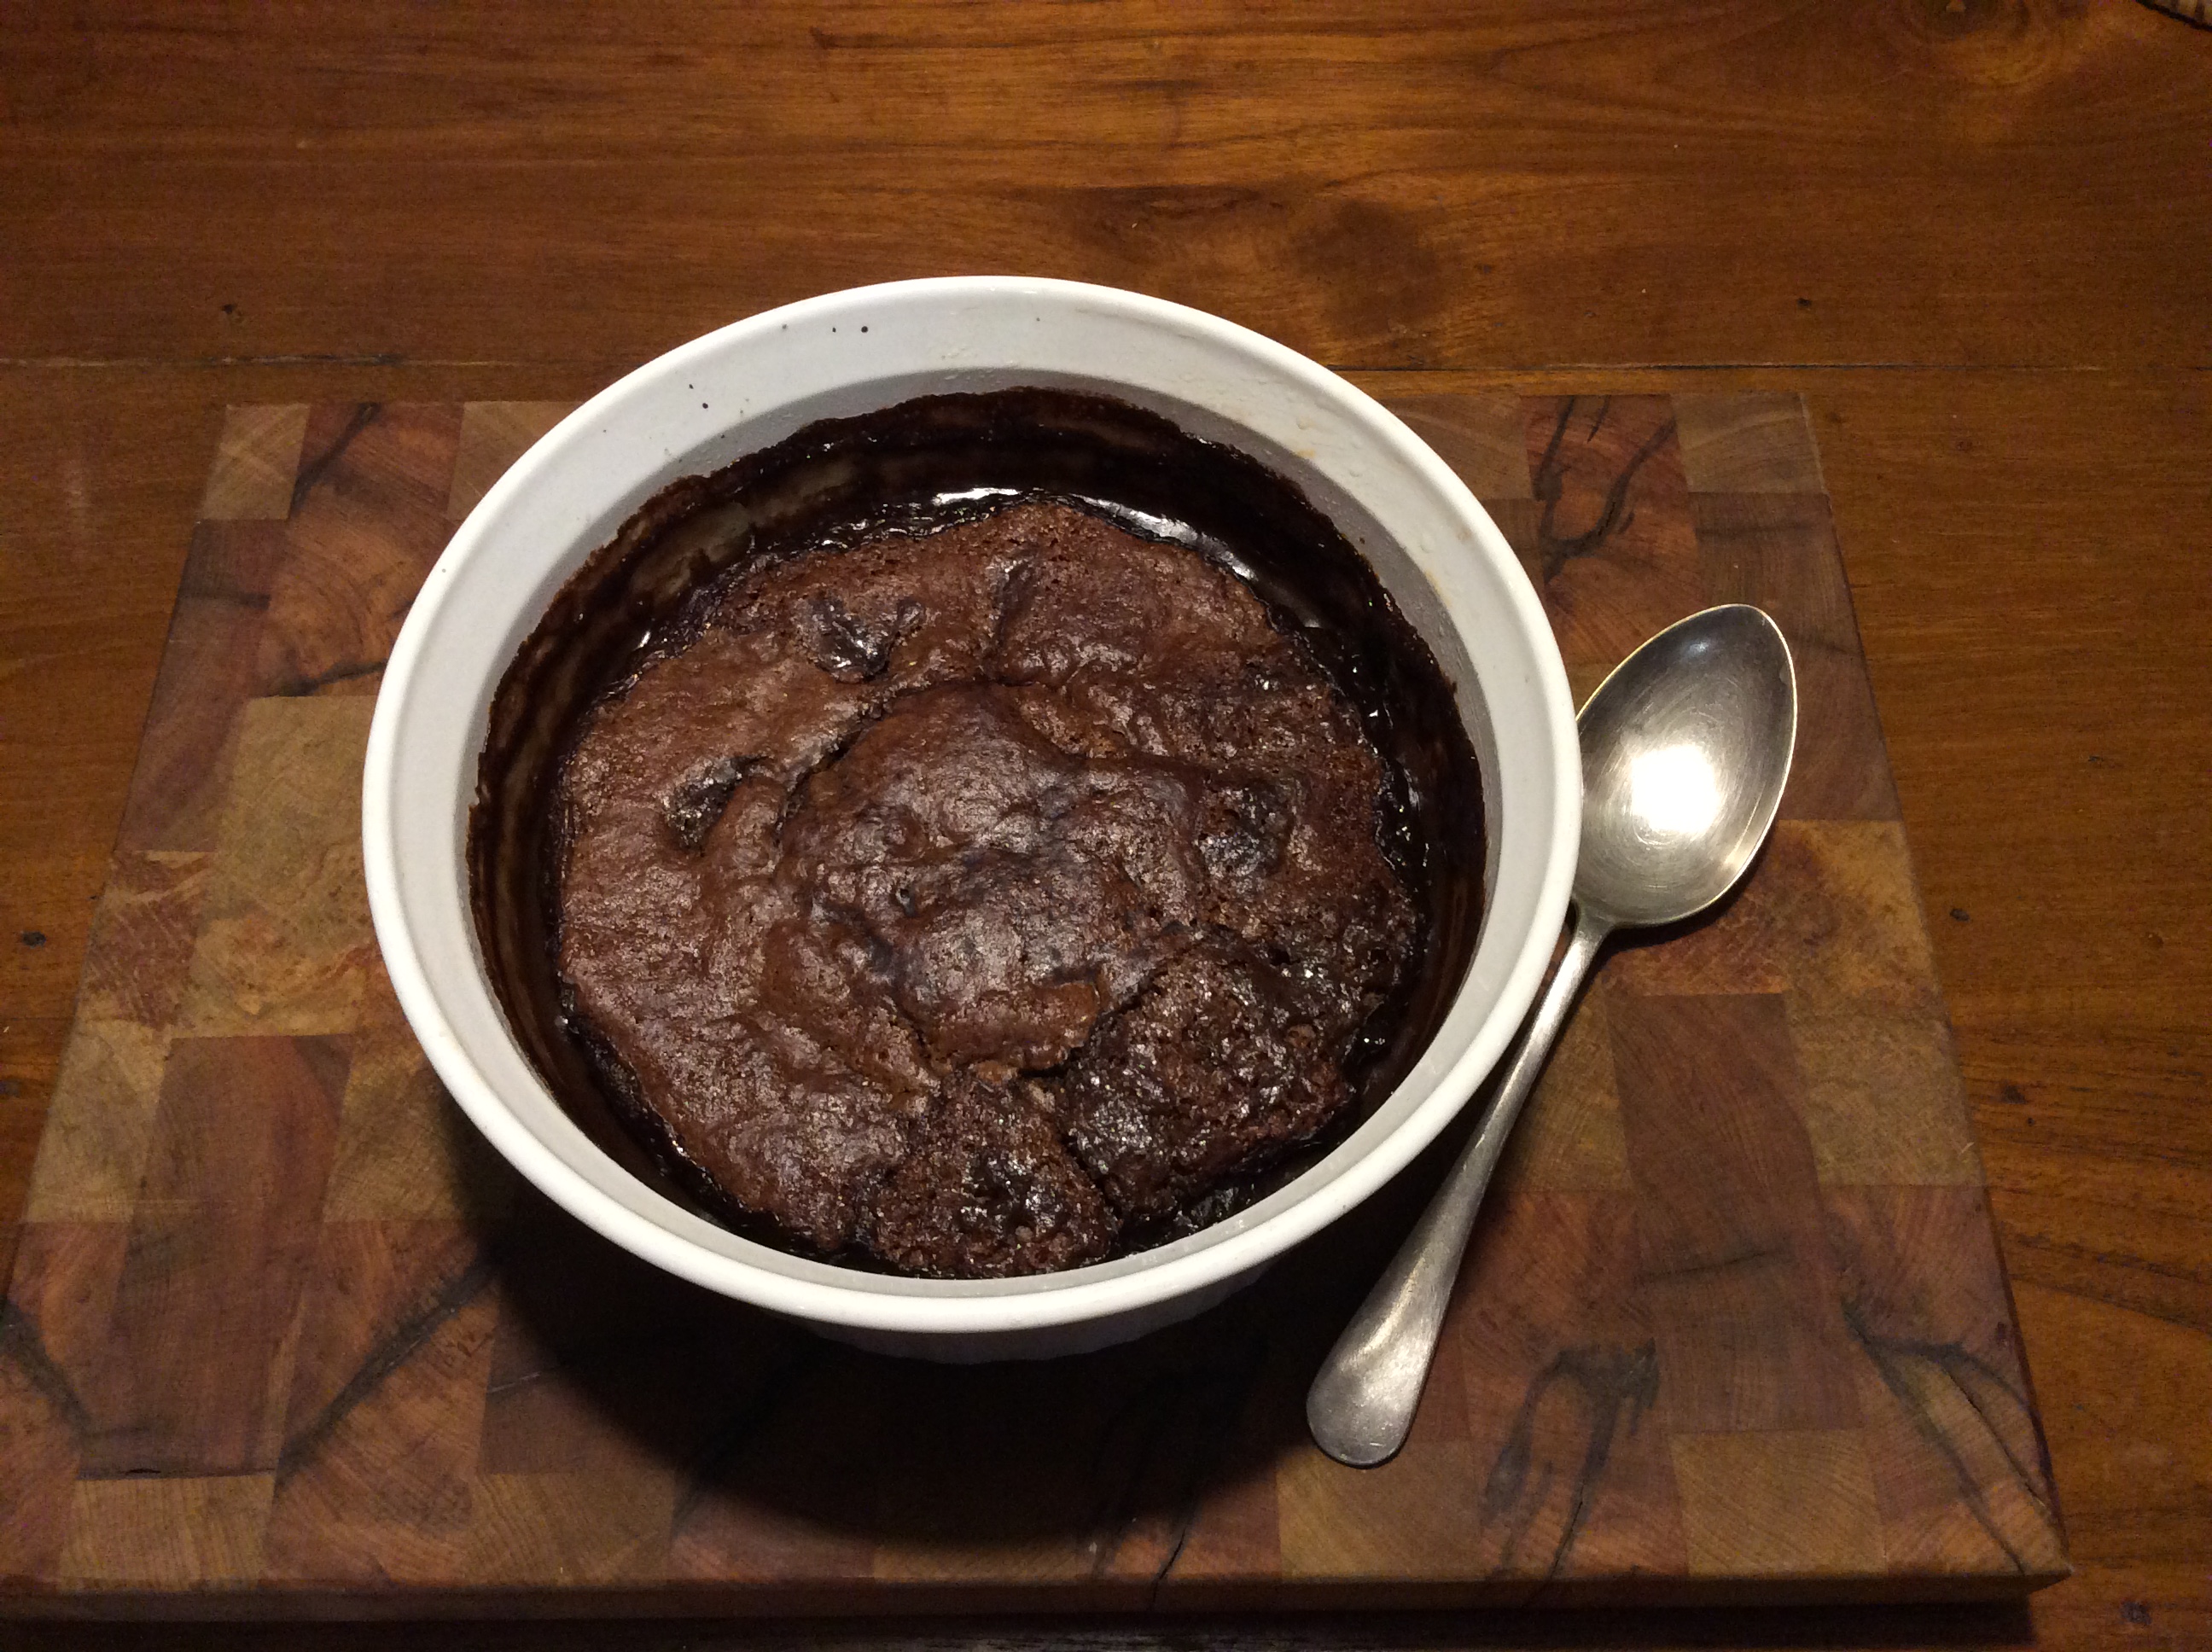
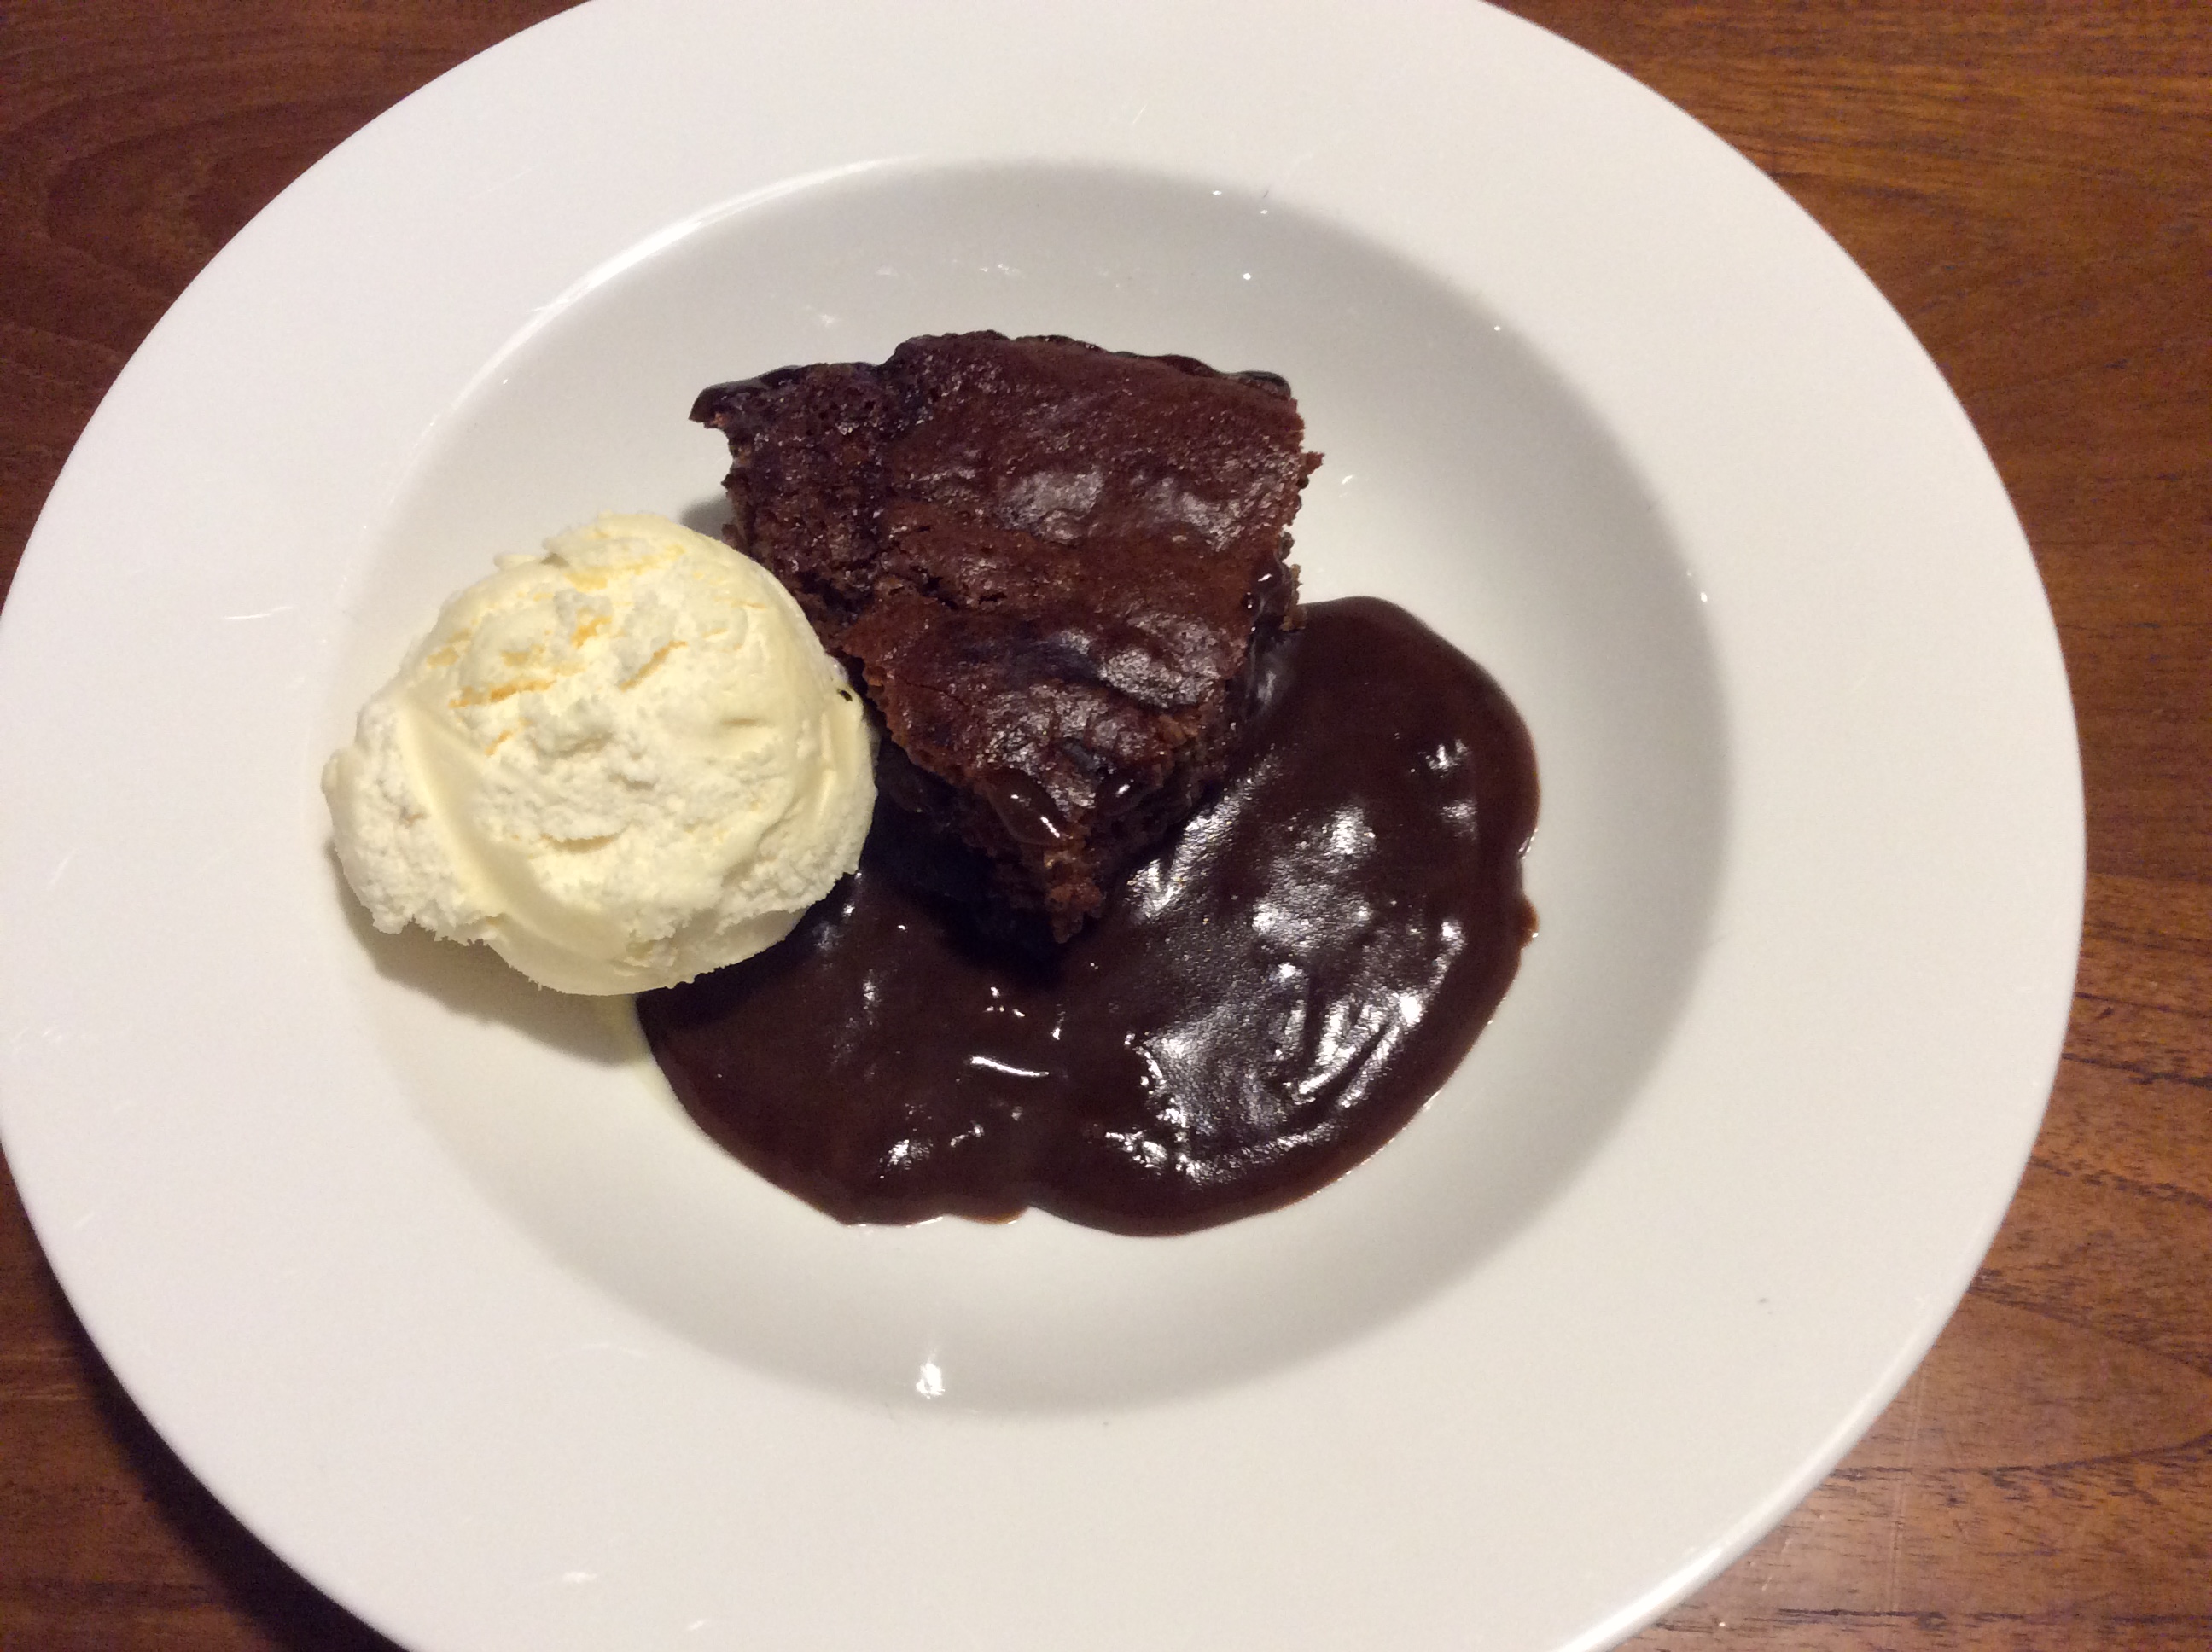
Heat oven to 180 degrees Celsius. Sift dry ingredients together, then add melted butter, milk and vanilla. Mix until smooth and pour into greased ovenproof deep dish. (If you are in a hurry you can mix it in the cooking dish too!) Separately, mix sifted cocoa and sugar, and sprinkle over the top of the cake mix, pour the hot water over the top. The topping will become the sauce, and the cake will end up on top. Bake for approximately 30-40 minutes (check after 30 minutes). Serve with vanilla icecream, cream or both.  Enjoy!

image

Advertisement

Fig and Ginger Jam

image
I bought some excellent figs at the Brookfield Markets from Sunrise Strawberries from Stanthorpe, who have beautiful figs and strawberries at their stall at the Market, which is held every fortnight at the Brookfield Show Ground. Tempted as I was just to eat them, I decided to make fig and ginger jam, which is superb with cheese, particularly blue cheese. I already have a fig jam recipe on this site, so I won’t repeat the method in detail, but here is the short version of how to make it, which is very easy.

Take a minimum of 500g figs, ripe but not overripe, and chop into quarters. You can go smaller if you wish. Place figs in a bowl and cover with an equal amount of sugar. Add approximately two tablespoons of prepared ginger pieces in syrup, finely chopped. This is a great product (from Buderim Ginger), which really adds to the flavour of the jam.
image
Leave 3-4 hours until the sugar “dissolves” and the figs disgorge some of their liquid. You shouldn’t be able to see the white sugar anymore. Place into a large pot to make the jam, and add juice of a lemon or lime. I used two limes as they are in season and limes are smaller than lemons. The acid in the citrus is important to get the jam to set. If your figs are a little overripe, I would add a little more lemon or lime juice. Don’t add any water to the mixture with this method.

Bring slowly to the boil, making sure that all of the sugar is properly dissolved before the mixture boils. Once it boils, the jam will jell quickly as there is very little liquid to evaporate, so watch it carefully that it doesn’t burn on the bottom of the pan. This isn’t a jam mixture to walk away from!
image
As soon as the mixture is at the setting point, take it off the heat and allow to settle in the pan for 5 or so minutes. Pour into prepared, heated jars, and seal immediately. I find if you have properly sterilised the jars, this jam keeps until the next Autumn when you are ready to do it again, but be sure to store it in the fridge once opened. Enjoy!

Spiced Pear Paste

image

I bought some great pears at the local farmers’ market a week ago, and decided to make spiced pear paste which is delicious with cheese. It was incredibly easy to make.

Ingredients:

600g pears, finely chopped or processed (around 500g peeled and cored)
500g sugar
Juice of a large lemon or lime
Spices of your choice, I used a piece of cinnamon stick, six cloves and a small piece of star anise – all wrapped in a muslin, or use a pinch of each spice straight into the pan

Place the pears in a large pan with the sugar, spices and juice, and heat until the sugar is dissolved. If the pears were chopped instead of processed, mash them down at this point. Bring to the boil and allow to cook until the mixture thickens and darkens. This will take around 10 minutes, but watch it carefully as mine started to catch on the bottom. When slightly cooled (but only a few minutes or it will set in the pan), pour the paste into small jars or into a pan lined with paper and cut into squares. If you want to keep it for any length of time, sealed jars are the best choice.

Lime Marmalade

image
Lime Marmalade is my favourite preserve to make and is always delicious with a beautiful tang and slight bitterness, which all of the best marmalades have. Limes are plentiful right now and at the peak of their season in mid Autumn. My lime tree was bursting with fruit, and the crop was the best I’ve seen. Lime marmalade is relatively uncomplicated to make with no seeds to deal with, and a good one to start with if you haven’t made marmalade before. All you need is limes, sugar and water. I started with around a dozen limes, but you can successfully make lime marmalade with half that, and this recipe is very flexible. If you are a beginner, it is best to start with smaller batches, rather than one large one.
image
Top and tail the limes, cut into half longways, and thinly slice. For Show work, you need to slice very finely. Put the lime slices in a large container, just cover with water and soak (covered) overnight or at least three to four hours.
image
Next, put the limes and soaking liquid in a large pan, bring to the boil and simmer (covered) for an hour. This is an important step to soften the peel, which will not soften any further once you add the sugar.
If you want to be sure of how much sugar to add, test for pectin (1 teaspoon mixture to three teaspoons methylated spirits), and tip the mixture onto a white saucer. If you have large clots, add the sugar cup for cup. If smaller (which is unlikely as limes are rich in pectin), you should add less sugar, closer to 3/4 cup sugar to each cup of mixture. In this case I added the same amount of sugar to the pan as the lime mixture. Note: you will be adding a lot of sugar, but this is important as it preserves the mixture, and fortunately you only eat a small amount of the marmalade at at time!
image
After adding sugar to the pan, add your candy thermometer (if you have one), and turn on the heat, ensuring that you allow the sugar to fully dissolve before it comes to the boil. At that point, boil the mixture rapidly until it comes to setting point, which is 104 degrees. The mixture at that point will come to a rolling boil, and will spit. You can also test for set using a small amount on a cold plate which will wrinkle, or use the spoon test, where the thickened mixture will “sheet” off the spoon. Watch the pan carefully at this point, as it will have a tendency to boil over. If this happens, when you are finished, add water to the spill and it is easy to clean up.
image
When the mixture reaches setting point, take it off the heat and allow to sit for 15 minutes so that the peel will distribute evenly. Don’t leave it too long, or the marmalade will jell in the pan. After letting it sit, take your heated jug and sterilised and heated jars, and carefully pour the marmalade into each jar using oven mits and protection.
image
Fill each jar to the top and seal immediately with the lid. image
Finish filling all of the bottles and don’t move them until they are cold, so that the marmalade can properly set in the jar. I made around a dozen bottles from this batch. If properly prepared and sterilised jars are used the marmalade will keep for 6-12 months. Enjoy!

Guava Jelly

image

It’s guava season, and making guava jelly is a perfect way to use up a huge crop if you have a tree in the back yard. Unfortunately the possums got to my tree before I did, and the ground was littered with guavas with one bite taken out, but I did manage to salvage enough for a batch of guava jelly. Guava jelly is delicious with roast pork, or eaten on its own as a preserve as you would a jam. It is also superb with cheese, particularly blue vein.

image

To make guava jelly you will need guavas (I had around 12 smallish guavas), sugar, water, and either some limes or lemons. Chop the guavas roughly, and place in a pan, just covering them with water.
image

Bring to the boil and simmer, with the lid on, for around half an hour. Strain through a cloth in a sieve for a couple of hours at least, preferably overnight. Important, do not press down or squeeze the fruit while doing this, allow the juice to slowly drip out.
image

After all of the liquid has dripped out, you need to test for the pectin content. Take one teaspoon of the liquid and mix with three teaspoons mentholated spirits in a glass, and tip onto a saucer. If there is one large clot, your mixture is strong in pectin, and you can add sugar cup for cup. If it has several clots (like I had, see below), add 3/4 cup of sugar to each cup of liquid. In the end I had three cups of liquid, and added three X 3/4 cups of sugar.

image
At this point, put the sterilised glass jars you are going to use in the oven on low heat, around 130 degrees, as well as a pouring jug (I use a glass oven-proof one). Add a candy thermometer to the pan if you have one, and slowly bring the mixture to the boil, ensuring that the sugar is fully dissolved before the mixture boils. Add the strained juice of two limes or one lemon. You will need to adjust the amount for your own quantity, but the proportion is around two tablespoons or lemon or lime juice to two cups of sugar. Lime juice is best with guava jelly if you have it.

Allow to boil until it gets to jelling point, which will be pretty fast. Mine took only 10-15 minutes. If you have a themometer, jelling point is 104 degrees, or you can use the spoon or saucer tests, which I have described in other preserves recipes. The other way in which you can tell is the smell, which changes at the end (it will smell amazingly good!), and the bubbles which get larger and start spitting – see picture.

image
Take the jelly off the heat, and prepare your jars. Pour relatively quickly into the prepared jars, or it will set in the pan, which you don’t want to happen! Pour slowly down the side of the jars, and seal immediately. My batch made one and a half jars, which was OK, considering I had shared most of the fruit with the possums in my back yard!

Pumpkin and Chorizo Frittata

image

This is a great breakfast dish made from organic free range eggs, chorizo and vegetables bought at the Moggill Markets at Brookfield. The Moggill Markets in Brisbane happen twice a month at the Brookfield Showgrounds, and the quality and variety always inspire fresh ideas. This recipe serves two, but can easily be adapted to serve three to four by adding more eggs and other ingredients. Enjoy!

Ingredients

1 small leek chopped (or use sliced red onions or spring onions)
3 large eggs, preferably organic and free range
Half a small chorizo sausage (I bought mine from the Moggill Markets where there is amazingly good salami available) – chopped bacon or any leftover meat would also be good
Quantity of pumpkin (cooked) – mine was left over from roast vegetables the night before – you can also use potato or sweet potato
Small handful chopped sundried tomato
Handful baby spinach (optional)
Small handful pinenuts (optional)

Method

Heat oven or grill on moderate heat (180 degrees or a little less). Gently whisk the eggs in a bowl and put aside. Sauté the leek in a little butter and olive oil in an oven proof frying pan.* Add the chopped cooked pumpkin and allow to gently colour. Add the chorizo and cook a little longer, than scatter over the pinenuts to brown slightly, and add the chopped sundried tomato to heat through. Lastly add the baby spinach leaves and cook very briefly until wilted. Pour over the eggs and allow the bottom to set, then put the pan in the oven or under the grill for a few minutes to set the top. Check constantly that it doesn’t overcook, as you only want to gently set the egg, not burn the spinach or other vegetables.

Serve immediately!

The whole dish takes around 10 minutes to prepare, and is a great way to use up leftovers.

* If you don’t have a heat proof frying pan (eg Scan Pan), you can easily finish it off on the stovetop by covering the pan with a lid or some foil. As with the oven, check frequently and don’t over-cook.

Strawberry Jam

image

Strawberries are in season August through to November, depending on the season, and are plentiful and cheap at the moment. When fruit is at the height of the season is also the best time to make jam, as the quality of the fruit will be at its peak. Strawberry jam can be difficult to set, and more than once I’ve ended up making strawberry sauce instead of jam, but no matter what happens, it’s great to eat!

Ingredients

Equal amount strawberries to sugar – this batch used 1.25 kg strawberries
1.25 kg sugar
Juice of half a large lemon

Method

Trim the tops of the strawberries and cut in half. Place in pan with the sugar, and gently heat to dissolve the sugar. Don’t allow to boil until the sugar is dissolved.

image

With a pastry brush, brush away any sugar crystals on the side of the pan with a little water.

image

Once the sugar is dissolved, boil rapidly, stirring occasionally.

image

Keep boiling rapidly until the setting point is reached (104 degrees) and the jam jells. You can tell when it is set as the bubbles change to more of a rolling boil, and more “spits” are sent up. Either use a candy thermometer, use the “wrinkle” test on a cold plate (the jam will wrinkle and stay apart when you run a finger through a small amount on the plate), or see if it “sheets” off the spoon (see other jam recipes on this website to see how that is done).

image

When the jam is jelled, take it off the heat, and allow to sit for 5-10 minutes and skim the foam off the top. Pour into heated and sterilised jars using a heated glass jug. Seal immediately. This recipe made four 500g jars of delicious jam.

Quick Lemonade Marmalade

image

Emboldened by my previous experiment with microwave cumquat marmalade (see last post), I decided to take it one step further and make lemon marmalade using the food processor and microwave oven. Definitely look away now if you are a marmalade purist! OK, I confess to being one too, but this was rather fun. Definitely not something you should do for Show marmalade though, as the result wasn’t exactly clear and glistening. But for transforming fruit to marmalade in under an hour, it was pretty good, and the taste certainly was good too.

I used Lemonade fruit, which is a cross between a lemon and a navel orange. Perhaps because it is a hybrid, my Lemonade tree is more susceptible to pests than the other fruit trees, and we haven’t had ideal growing conditions for years, so the tree is stressed, and therefore the fruit isn’t in great shape. However it was fine for this purpose, and I used three for this recipe.

image

Ingredients

500g lemonades or lemons (I used three)
1 1/2 cups water
3 cups sugar

Method

Top and tail the fruit, and cut in half vertically. Remove seeds, and soak in a little water (from the allowance). Using the slicing attachment on the food processor, finely slice the fruit. You can of course do this by hand, but in the food processor it takes seconds and the result is excellent. I do however pick through it and take out the ends which slice too thickly.

image

Put the fruit together with the water in a microwave dish (mine was around 3 litres), and cook for 10 minutes until the rind is tender.

image

Add the sugar, and strained liquid that the seeds were soaking in. Cook until jelled, somewhere between 20-30 minutes; mine was closer to 30. Bottle immediately and lid straight away.

Voilà!

Microwave Cumquat Marmalade

image

Warning: For any preserves purists, look away now!

It’s late winter, and we are full on into the citrus season, with lemons falling on the ground, and the Seville oranges ready in a few weeks. Over the past few years we have been cycling through drought and then too much rain which is playing havoc with my fruit trees, but this year there were just enough cumquats to make marmalade, although the quality wasn’t great. I was toying with using them for marmalade, knowing that it wouldn’t work out well due to too much rain (always a killer for jams and marmalades setting), and spotty fruit. Right on cue, my sister rang, excited having tried her first ever batch of jam, which happened to be cumquat, and made in the microwave. Intrigued, I thought it might be worth the experiment, as a small amount of fruit wasn’t going to work out well, together with everything else. Happily, I got a great result, and here is the recipe, adapted from the original Australian Womens Weekly Microwave Cookbook, circa 1986.

The beauty of using the microwave is that no overnight soaking or pre-cooking is required, making the process much quicker and cleaner. Not recommended for show cooking, but if you have a small batch and want to get a quick result, this might just be worth trying!

500g Cumquats, de-seeded and cut into quarters
1 1/2 cups water
3 cups sugar

image

Add the water to the cumquats in a microwave proof dish (mine was about 3 litres), and microwave on high for 10 minutes until the cumquats are cooked and the rind tender. Add the sugar and stir well, so that the sugar dissolves before you boil the mix. Microwave on high until the mixture jells, and the marmalade “sheets” off the spoon (see other posts on cooking jams and marmalades to see what this means). This took around 25-30 minutes. Allow to sit for 5 minutes, then bottle and seal immediately.

Fig Jam

image

Figs are still available in the shops in late Autumn, and they can make fantastic jam. I also like to make fig and ginger jam, as it is superb eaten with cheese, especially brie, camembert, and blue vein. Match made in heaven!

Figs are an unusual fruit, as they are inside out. They are one of the earliest fruits, and feature in the Bible and many early writings. I think they make an outstanding jam, but it isn’t exactly economical to make! It is also notoriously fickle, and has a nasty habit of burning on the bottom of the pan. Luckily burnt fig jam is another sub-genre, and pretty good too!

Ingredients

Figs
sugar
lemon

Method

Trim the top off the figs and cut into quarters. Sprinkle with sugar, the same weight as the figs, and leave overnight, or at least 4-5 hours so that they disgorge all of their liquid.

Place in a pan with the strained juice of one or two lemons (depending on the weight of the figs – for a large batch use two lemons), and ensure that the sugar is fully dissolved before you bring the mixture to the boil.

image

Once the sugar is dissolved, boil rapidly until the jam reaches the set point (104 degrees C). Either use a sugar thermometer (highly recommended), use the “wrinkle test” (place a small teaspoon of jam on a plate, and draw your finger through – if the jam wrinkles and holds it shape, it is done); watch for it “sheeting” off the spoon; or look for changes to look and feel and smell, in particular the bubbles will get much bigger, the mixture will try to boil over, and it will send up a some spits.

Fig jam will jell quite quickly, particularly using this method, and needs to be carefully watched and frequently stirred. If it does stick to the bottom and burn, you can still save the mixture by not stirring in the burned bits from the bottom.

image

Once the jam has jelled, take it immediately off the heat, wait five minutes and bottle immediately into heated, sterilised jars (see Orange Marmalade recipe for how to do this). Lid immediately.

Hint – pans and jam making equipment are easy to clean when soaked in cold water – just rinse off, and no detergent or further washing required. Same with any spills on the stove, just soak in cold water and wipe straight off. As with all preserves, the hot mix is very dangerous and can cause very nasty burns. Never make jam with little children around, and always wear oven mits, and take care when handling the mixture.